顯示具有 Dear Lizzy 標籤的文章。 顯示所有文章

2016年4月4日 星期一

Project Share / Another Flipbook Using Heidi Swapp September Sky Colllection & MHC#16

Hello, crafty friends, I hope you all had a great weekend. I've been addicted to making flipbooks lately, so I made another flipbook to share today featuring Heidi Swapp September Sky collection. I love this collection so much that I have to hoard both 12 inch and 6 inch paper stack, along with coordinating die-cut shapes, sticker, stamp set and color shine sprays. XD

In this project, I used mint, gold, gray and soft pink as my color scheme. I also followed Tmika's tutorial showing how to use 4 envelopes to make a base.


See how beautiful it is when mint and gold and glitter meet together.


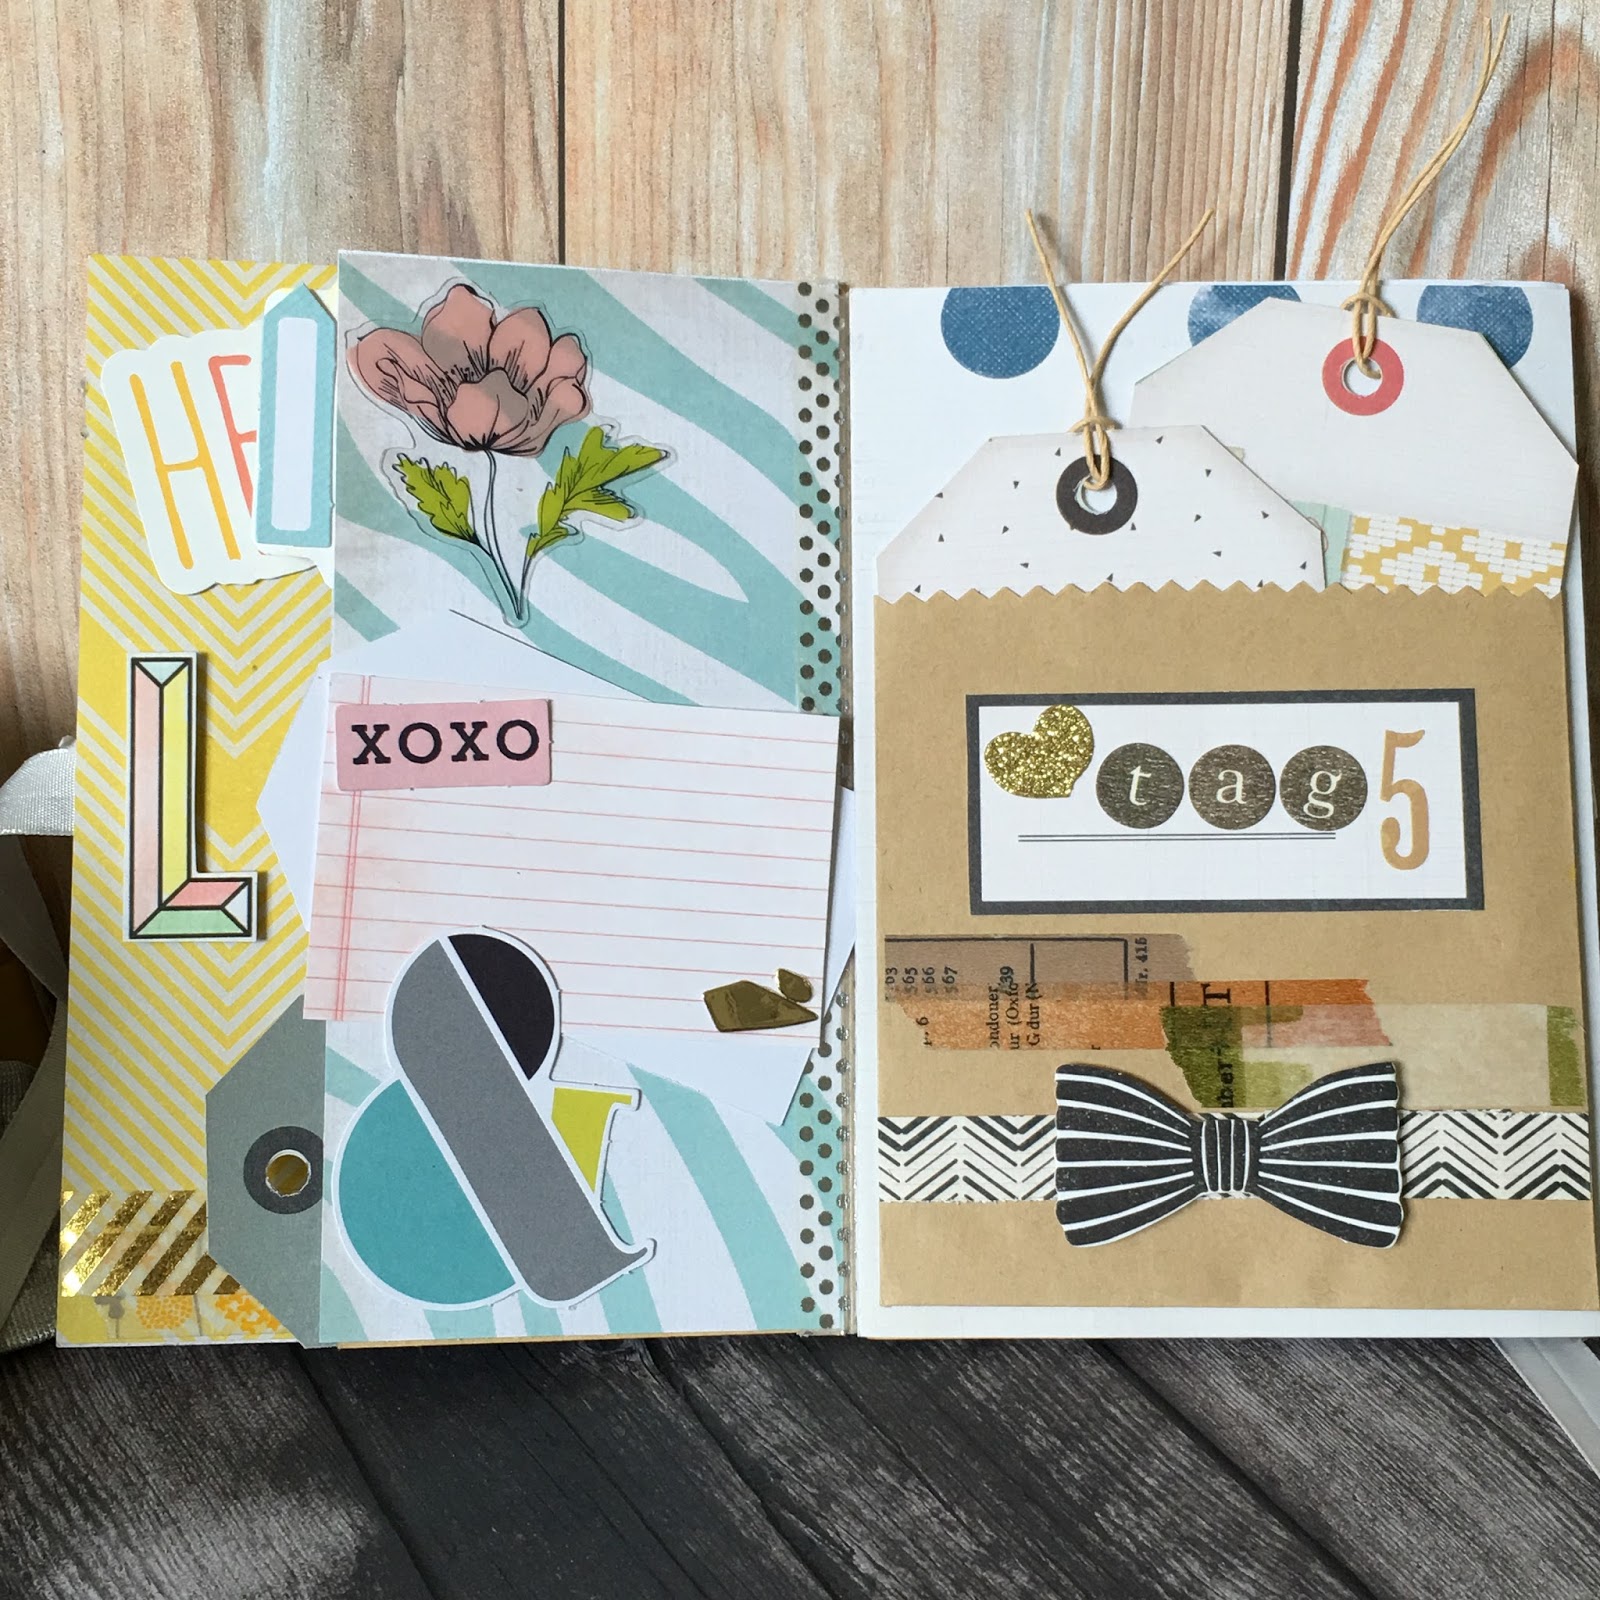
On the fist page, I used MFT die to cut several letters from a glitter cardstock, stamped "Darling" from Amy Tangerine's stamp set and decorated the page with washi tape and die-cut shapes from September Sky collection. I made two extra pages between the 1st and 2nd page with a clear cardstock and journaling cards, decorating with some washi and glitter tape. 


The stickers on the right flip page are cut out from a washi tape designed by a Taiwan's company. So cute!


The 3rd and 4th page. They took me almost a whole day to decorate them. I was stuck by these two pattern paper. I love these two paper, but they just didn't go well together. After several tries and failed, finally I had to use a vellum cardstock to separate the busy floral pattern on the right. 


I made an envelope tucking some embellishments and page flags inside.


Honestly, I was exhausted decorating this page, so I kept it simple. XD.


I made a garland using glitter and gold foil washi tape. And them I stamped the cute little bunny with MFT stamp set, colored with color pencils and then used the coordinating die to cut it out.


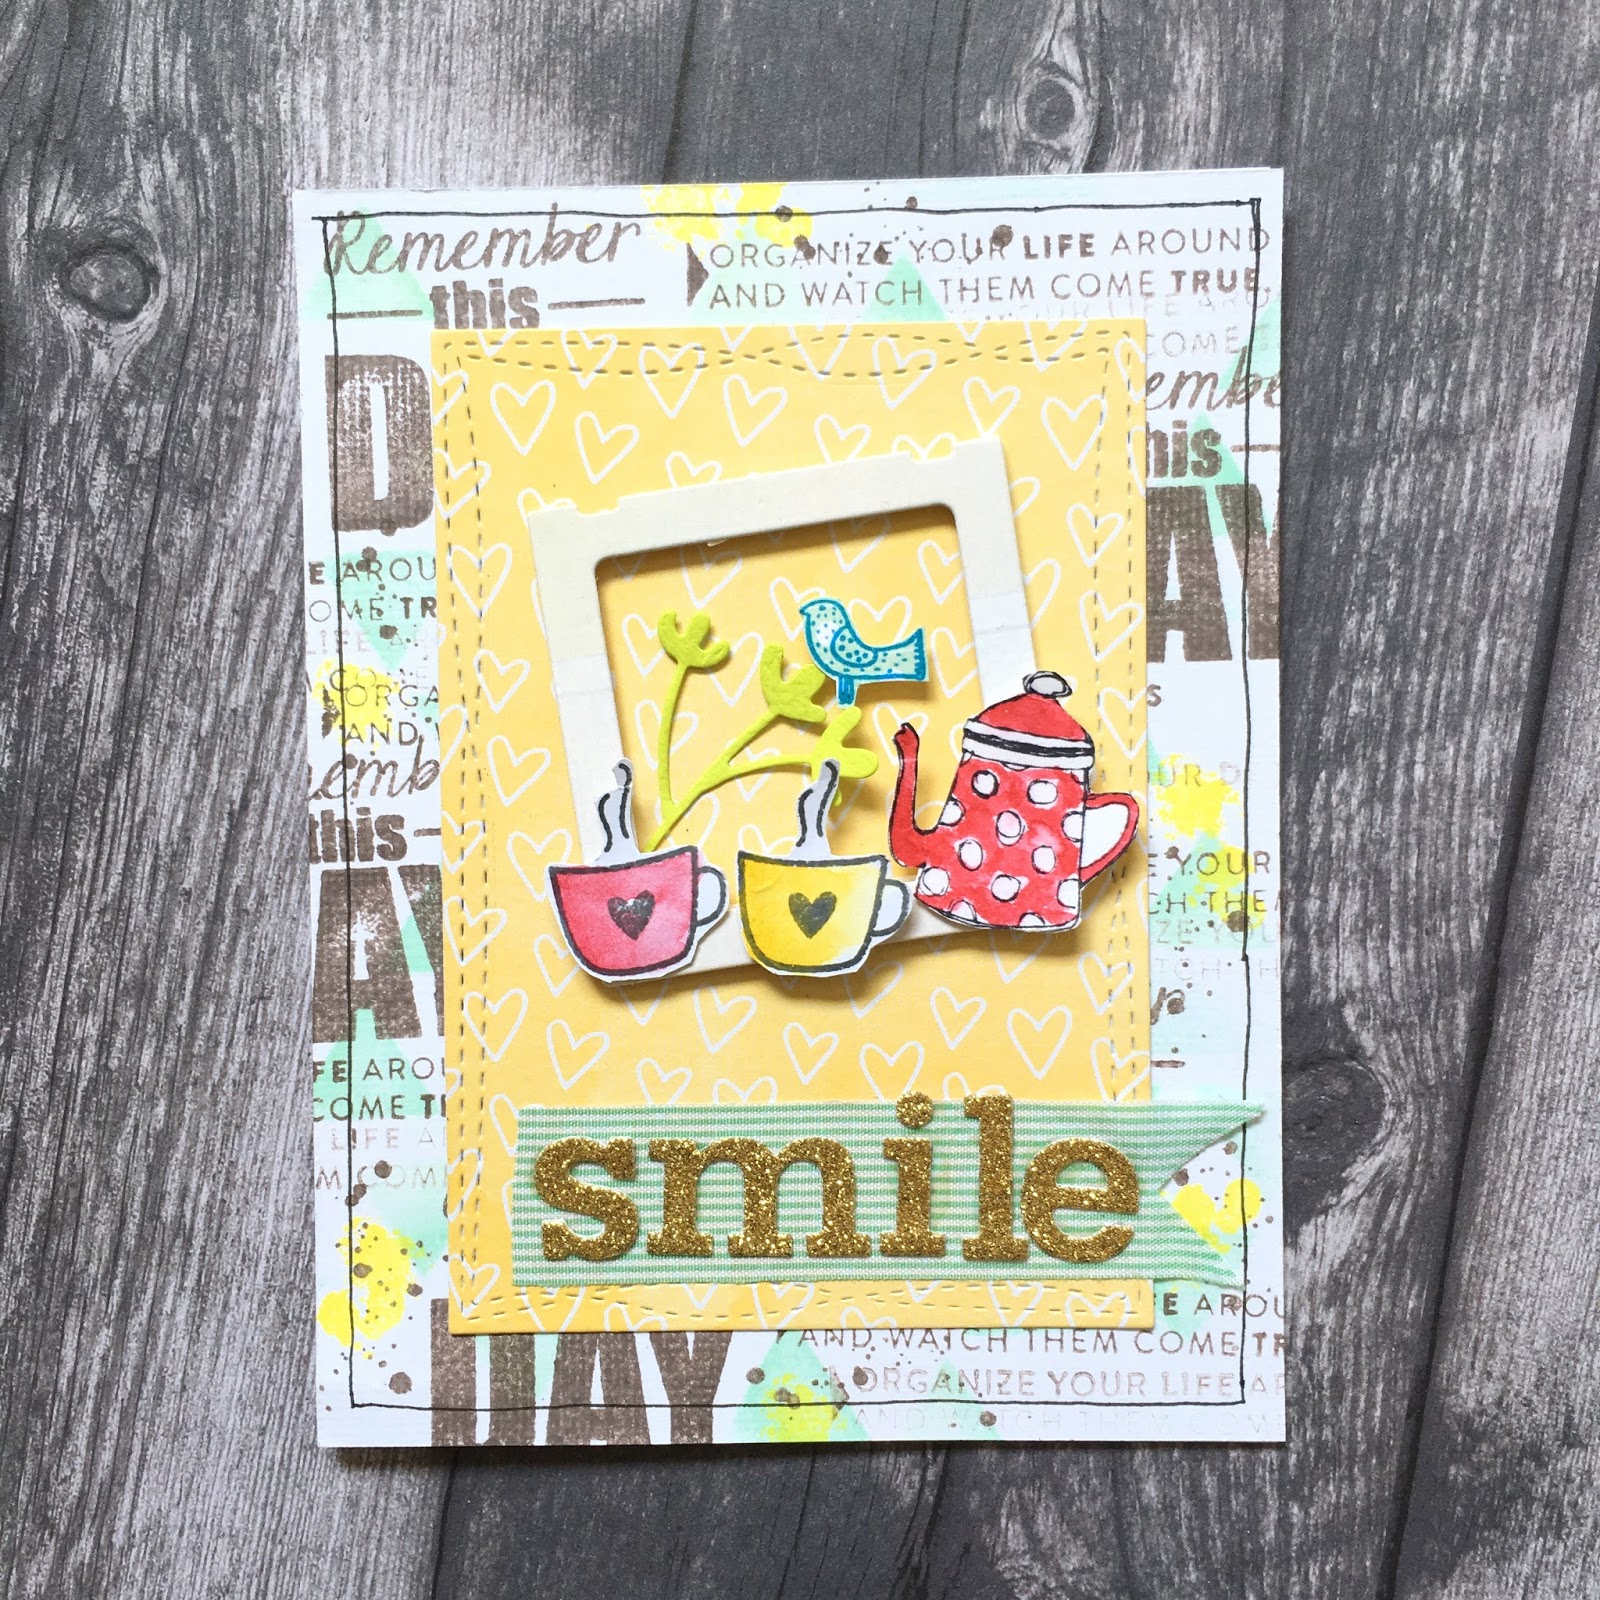
In order to take this month's MHC challenge, I made a shaker tag using WRMK fuse tool and a page protector. Filling some sequins and decorating with some stickers and die-cuts, DONE!


Hope you like it! Thanks for stopping by.

L.O.V.E


*****************************************************************************

在上一篇的貼文裡有提到flipbooks. 我趁著這幾天連假又做了第二本flipbook. 這一次使用了薄荷綠, 金色, 灰色和淡粉色作為整本flipbook的主色調。剛好魔力手作挑戰這個月的題目是搖搖卡,於是做了一張小卡呼應。


搖搖卡(shaker card / shaker tag)是用WRMK的魔法相片口袋工具組(fuse tool)和透明文件資料袋做的,如果妳/你剛好不知道甚麼是fuse tool, 可以搜尋一下youtube影片,這是一個必備的好工具!(這不是一篇勸敗文,這不是一篇勸敗文,這不是一篇勸敗文)

小卡上面的sweet是用kesi art的刀模切出來的,小鴨子和小熊則是市面上的書局買得到的貼紙。搭配在一起是不是超可愛的!!!! 大心。搖搖卡用迷你小木夾夾著,收到的人可以拿下來再利用。


封面是清爽的薄荷綠搭配金色,這整本小書的美編紙和許多圖卡都是來自Heidi Swapp的九月天空系列(September Sky),我非常喜歡這個系列,不論是紙本還是圖卡,甚至印章和主色調的噴瓶我都有買。Heidi家的噴瓶有細微的珠光,顏色非常漂亮,想購入噴瓶的人可以參考一下她的設計(這不是一篇勸敗文,這不是一篇勸敗文,這不是一篇勸敗文) 。happy是用mama elephant的刀模切出來的。(我已經寫不下去了怎麼辦?!)


這本flipbook其實有點難產,花了不少時間和心思來做,除了花時間自己做小配件之外,主要是因為我選的美編紙放錯順序,導致第3頁和第4頁的花色衝突,在做好了拆掉,拆了又做之後,最後決定加入水晶卡來區隔,幸好最終出來的成品還可以,不然這本得被我丟在一邊等待哪天回收利用了   囧


為了避免有勸敗的嫌疑,我決定放照片就好.......


這真不是為了偷懶......


這就是讓我苦思冥想了一天的第3頁第4頁。沒想到水玉和花卉竟然這麼不合群,完全不聽我指揮,明明應該是絕配啊..... 最後我不得不當拆散人家姻緣的劊子手,拿張水晶卡把兩頁分開,於是我又多了兩頁要裝飾........


這一頁除了搖搖卡之外,我最喜歡的就是小兔子了。印章和刀模是來自My Favorite Things(MFT),為了要展現出水彩的效果,我用油性鉛筆上色。是的,客倌你沒看錯,是油性鉛筆,不是水彩。淺色水印印台蓋印之後先用水筆沾水沿著圖案邊緣抹一圈,淡化圖案的線條,然後挑幾個顏色柔和的油性鉛筆上色。

水桶裝番茄的圖案是貼紙,剛好也是水彩風,所以我把圖案和隔離紙一起剪下來貼到其他卡紙上再一次剪下來,小兔子也只是點上一點膠,這樣貼紙就可以給收到的人用了。


看到這裡妳終於可以鬆一口氣了,感謝妳/你耐心地看完這麼落落長的文(其實要不是為了避免淪為勸敗文,我完全可以再寫個500字.....),有一些省略的步驟我沒寫到,所以如果妳/你從前一篇到這一篇還是不清楚flipbook怎麼做,或者真的很想要我一個步驟一個步驟的介紹的話,請來信問我吧~~~ 


本部落格裏除了另外註明照片或影片來源的資源,其他使用在部落格中的照片或影片均為我自己拍攝及製作的,版權所有,請勿任意使用或拷貝。

2016年4月1日 星期五

Project Share / My first flipbook (小書)

Flip books and pocket letters are very trendy right now. As both of them are alternative forms of snail mail, I would like to participate in it, though I don't have any penpal to sent for now. XD

After researching some popular posts on Youtube and Instagram, I got a few points to make my version of flip book. I also followed Tmika's tutorial(scrapdaworld) using envelopes to make the base.


I used a lot of die-cuts, ephemera, shapes, cut-outs, pattern paper, tags, washi tapes to decorate the flip book. Oh, I also made myself a tassel from floss! Lots of FUN!


The "LOVE" was cut from Maggie Holmes's paper(Shine collection), added some watercolor and foam tape to pop them out.


The brown paper pocket was made out of a Kraft envelope, put some stickers and washi.


*************************************************************
不知道大家有沒有注意到最近國外很風行的手作--pocket letters 和 flipbooks。這兩種都是snail mail的延伸,所謂的snail mail在字意上叫蝸牛郵件,顧名思義是指非電子郵件,而是利用傳統的書寫方式貼上郵票拿到郵局去寄的郵件,簡單來說是一種反璞歸真,回歸文字與紙筆,利用遞送的距離與等待的時間,讓文字的溫度重新串聯情感的方式,其實就像是以前學生時代寫信交筆友那樣。而pocket letters 和flipbooks是由此變化而來的,利用類似棒球收集卡透明袋,或用紙張/信封作成小書(像相本),內容除了個人的資料(如姓名,興趣嗜好)之外,放一些小東西送給筆友。我之前也做過pocket letters,改天再放上來跟大家分享。

這本flipbook是看了Youtube上一個彩印人(Tmika)的教學影片後做的,她是利用四個信封做成小書,然後貼上美編紙之後再開始裝飾小書,我在做封面的時候書背處貼上紙蕾絲然後用拼貼膠加強,還加了緞帶這樣就可以綁起來。


左手邊那個粉橘色的流蘇是利用繡線自己做的,流蘇這個元素現在在美編界也很風行,不只相簿美編看得到,連手帳也能看到流蘇的蹤跡。我用迴紋針夾在封面,收到這本小書的人還可以把它拆下來再利用。其他幾頁就用一些小卡,圖卡,刀模,和紙膠帶來裝飾,我還利用信封和格拉新紙做了小紙袋貼在裡面,然後塞了一些小卡和貼紙送人。雖然沒幾頁,但是著實花了不少時間,不過真的很有趣,我打算再做幾本來玩。

除了這次用信封來做小書之外,還有另一種更簡單的方式來製作手翻書的本體,那就是用三張雙面美編紙(或是六張單面美編紙(背貼背)),以和紙膠帶黏貼串聯起來,有興趣的人也可以搜尋一下相關貼文和影片,動手作作看喔!

PS: flipbooks挺難翻譯成中文,如果有人有更貼切或更正式的稱呼請跟我說喔


本部落格裏除了另外註明照片或影片來源的資源,其他使用在部落格中的照片或影片均為我自己拍攝及製作的,版權所有,請勿任意使用或拷貝。

2016年3月30日 星期三

Card Making / Chocolate Love for MHC#15 魔力手作挑戰#15

    Hello! Happy Wednesday.  We finally got lovely sunshine after a coupe of weeks of cold weather and rain. As spring is in the air, it couldn't be better to see sunshine out there.  Today I have a card to share with you. This month, More Handmade Challenge asks participants to make projects with hot cocoa. You can use the shape, the color or the image of  hot cocoa.

    As a big fan of mint chocolate, I know I have to use this color combo on my project. I think it's a good idea to bring some fresh and bright colors in this season. To start off, I  used a triangle shape stencil with Crack Pistachio Distress Ink, and then used Hot Fudge Hybrid Ink from MFT to stamp my sentiments.  I also stamped some splattered images from Hero Arts with a yellow dye ink.


    After finishing my background paper, I died cut a piece of yellow pattern paper with MFT's wonky stitched rectanle die, letters(from PTI) and a polaroid frame(from Maggie Holmes). I also stamped a couple of cute images on a white cardstock, colored with my watercolor, and then fussy cut them out.  After all decorative accents were ready, all I needed to do is to put them together.


*******************************************************************************************************
    下了幾個星期的雨,太陽終於露臉了!遲來的春天的氣息,一掃之前的潮濕與陰冷。在寒冷的溫度之下,來杯熱巧克力暖暖身子簡直不要太幸福!

    這個月的魔力手作挑戰的主題是熱可可。一想到熱可可就是巧克力做的,我決定把最愛的薄荷巧克力拿來當作靈感,決定了主色之後,接下來就是找一些搭配的色系和圖案來用。在構思這張卡片的時候其實前前後後搭配了好幾種構圖,因為自製的背景底紙比較複雜,最後決定用比較簡單的圖案來搭配。

    介紹一下這次自製的美編紙,我先用型板刷了薄荷綠的顏色,刷的時候只要這裡一點顏色,那裡一點顏色就好,不用把整張卡紙都刷滿,然後用MFT的松露巧克力印台來蓋所有的字章。

    在蓋的時候,大字章是我的主要重點,所以沾了印台就直接蓋在卡紙上,然後小的長條型字章則是蓋過一次之後直接蓋第二次,讓兩種深淺的咖啡色蓋滿卡紙,又不會因為顏色太重而讓人眼花撩亂。最後我還蓋了一些噴濺的圖案,當然如果你沒有這種印章,直接拿把刷子沾顏料灑一些在卡紙上也可以,我用印章蓋是因為這樣比較好控制。

    由於美編紙已經很花俏了,所以搭配的圖案或圖卡要盡量選用同一個色調的,重點突出的顏色不必很大片,有畫龍點睛的效果就好,這樣才能讓卡片看起來平衡又有抓人眼球的地方。

    FB的粉絲頁上有更多其他手作人的精彩作品,如果你/妳也喜歡手作,歡迎加入魔力手作挑戰,還有彩印在台灣的粉絲社團,一起分享手作和採印的樂趣。


本部落格裏除了另外註明照片或影片來源的資源,其他使用在部落格中的照片或影片均為我自己拍攝及製作的,版權所有,請勿任意使用或拷貝。


Supplies:
stamps: Never Say Never(Kesi Art), Coffee Break(Prima), Distressed Pattern(MFT), Everything Pocket Page(TT), 
inks:Hot Fudge Hybrid Ink(MFT), Cracked Pistachio(Tim Holtz), yellow dye ink(), Lagoon(Versa Fine)
Dies: Leaves(Kesi Art), Love Is(Maggie Holmes), Wonky Stitched Rectangle Stax(MFT)
Others: Triangle stencil(Heidi Swapp), watercolor, glitter cardstock, fiber tape, foam tape

2015年7月26日 星期日

Card Making / MFT Wednesday Sketch Challenge - Sketch 238

I made a shaker card today for My Favorite Things' blog challenge.

Wednesday Sketch Challenge - Sketch 238


Let's Party!
    To start off, I died cut my card front by MFT Blueprints 21#.  I then used the long stars stamp from PTI's Around and About stamp set to make my card base. I banded the stamp with a curve and inked with couples of inks: Sweet Blush, Hibiscus Burst, Raspberry Fizz, Harvest Gold, and Melon Berry.

And then I died cut my stamped cardstock with MFT Peek-a-boo Circle Windows.  I also cut a piece of fun foam to raise my card so that it added some thickness to my sequins.  After pouring some sequins and beads, I closed my window with a piece of pattern paper from Dear Lizzy Neapolitan collection for American Craft.

Then I stamped a couple of images on another piece of white cardstock using Studio Calico stamp set, Just for you stamp set by Neat and Tangled, and then I fussy cut them out.  I put some foam dots to raise the cat and the yellow balloon. I glued the card front to a A2 size Kraft cardstock.

Isn't it cut? I love the cheerful colors and images.


XXOO
Summer


Supplies:

Stamp: Around and About from PTI, Birthday by Lizzie Mackay for Studio Calico, Just for you from Neat and Tangled.
Inks: Sweet Blush, Hibiscus Burst, Raspberry Fizz, Harvest Gold, and Melon Berry from PTI; Sunshine, Lemongrass, Fresh Mint from mama elephant; Archival Ink Jet Black from Ranger.
Cardstock: Stamper's select White cardstock, Kraft cardstock from my local shop.
Dies: Blueprints 21#, Peek-a-boo Circle window all from MFT


**********************************************************************

參加了這個星期的MFT構圖挑戰
剛好這兩天在做魔力手作挑戰的星星卡,就以星星為背景做了一張搖搖卡

首先將PIT的長條形星星印章彎出一些弧度貼在水晶塊上,然後挑幾個顏色可愛的印台蓋幾條星星,有點像派對上裝飾用的花環

然後用MFT的刀模切出圓形的缺口,我切了一片手工藝用的泡棉卡貼在卡紙後面
這樣等一下放亮片和珠珠的時候就不會貼在卡片上面

我發現用手工藝泡棉比用雙面泡棉好用多了
第一,省! 
(哈哈~ 手作這個坑可是很燒錢的,要想盡辦法省,感謝珍妮佛小姐的巧思)

第二,用泡棉的話不用擔心亮片和珠珠黏在雙面膠上面
我之前做搖搖卡時常發生這個問題,用了泡棉之後珠珠和亮片一個個都很獨立

第三,大面積的泡棉可以支撐整張卡面,不會出現沒有雙面泡棉的地方會凹下去的情況


等搖搖卡做好後,剩下的就是裝飾啦
我用Studio Calico和Neat and Tangled的印章蓋了貓咪和氣球
用剪刀剪下來後貼在卡片上面

是不是很有party的fu啊!


2015年4月12日 星期日

Tag Making / Cupcake Tags

Hello, blog friends, I hope you'll have a wonderful weekend.
I would like to share a couple of tags I made today.
Since I made a tag as my entry to More Handmade Challenge #4 last week, I'm in love with these tags.


I made 4 tags in total.

CfraftingFun Design


 This one is a duplicate of my last tag (see HERE). 
One of my friends loves the tag, so I made another one for her.
I added "enjoy" die cut from Papertrey Ink's die called Wet Paint Die Collection.


CfraftingFun Design


The second tag is actually a Thank You tag.
CfraftingFun Design

I used the stripe stencil by Heidi Swapp, inking with sweet blush ink pad by PTI.
Then I used a Thank You stamp by PTI  to stamp on the bottom of the tag several times.
And then I stamped the flower image on a watercolor cardstock, gold embossed and watercolored it. 
I fussy cut it out and put a foam dot to pop it out on the tag.


The third & forth tag are using the same layout.

CfraftingFun Design

The chevron pattern on the background is a stencil by Heidi Swapp as well.
The blue ink is Hawaiian Shores ink pad by PTI.


The cute strawberry is a die by PTI called Strawberry Patch
It's such an adorable die set.
I cut the image using felt from my local shop.


The pear and the coordinating die are both from Wplus9.
I spritz some gold color shine to add some shimmer.
The "enjoy" die-cuts are colored with my copics.
 di
CfraftingFun Design


Supplies:
Paper: Stamper's Select White Cardstock by PTI, watercolor cardstock, and Neapolitan 6x6 paperpad by Dear Lizzy for Amercian Craft

Ink: Sweet Blush, Hawaiian Shores, Hibiscus Burst by PTI: watercolor; buttercup, bubblegum, lemongrass by mama elephant; Gold color shine by Heidi Swapp; Copics: YG11, YG41, E93, E95

Stamp: Love lives Here, Sew Simple Borders by PTI, Carnival Cupcakes by mama elephant, Serendipity from Dear Lizzy by American Crafts, Pears by Wplus9

Die: Tag Sales #3, Strawberry Patch, Wet Paint by PTI,  Carnival Cupcakes by mama elephant; Pears by Wplu9

Others: pink and green craft felt from my stash


2015年4月6日 星期一

Card Making / You Are My Sunshine (MHC#4)

Todays' last project!!!

This is a challenge I take from More Handmade Challenge. 
In this challenge, you have to combine at least 3 items that can line up as a line, just like Bingo cards.
I chose colors, stripes and sequins.


MHC#4

And here's what I came up with.
CraftingFun Design


CraftingFun Design


I started off with stamping my card front. I used PTI's Watercolor Wonder stamp set, inking up with Hibiscus Burst ink pad.


Then I layered up with some die cuts with foam tapes, added some gold spay, then finishing with some gold sequins. 

I love this card.
It's so vibrant and cheerful.


And I made a tag as my second entry to this month's challenge.


CraftingFun Design


I stamped the cupcake image on a watercolor cardstock, using some pink and yellow butter ink pad as my paint.
Set aside to let dry. 

Then I cut a piece of cute pattern paper to layer on my tag.
After the cupcake image was dried, I died cut them with  the coordinating dies.
Then I used my black sharpie to outline the image.
Here's point, it's just a free hand outline, no need to be exact.


Then I sprinkled some colorful sprinkles on the cupcake. 
Isn't it cute!!


CraftingFun Design


Supplies:
Ink: Hibiscus Burst ink pad by PTI, Butter Cup ink pad from mama elephant, Gold color shine by Heidi Swapp
Stamp: Watercolor Wonder, Love Lives Here and Sew Simple Borders by PTI, Carnival Cupcakes by mama elephant, Serendipity from Dear Lizzy by American Crafts
Die: Phrase Play #1 die and Tag Sales #3 by PTI,  Carnival Cupcakes by mama elephant
Others: Neapolitan paper pad from Dear Lizzy by American Crafts, gold sequins from my stash


2014年12月10日 星期三

Card Making /Mama Elephant On your birthday


Happy Wednesday! 

在臉書上響應爲癌症病友募款的義賣活動做了一批卡片,這是其中一張。
用了我很喜歡的 mama elephant 的印章及印台
杯子蛋糕和動物們都以水彩上色
最後搭配色彩繽紛的美編紙來突顯重點
希望收到這張卡片的人會喜歡。


Supply list

Stamp: Carnival Cupcakes from mama elephant, On your birthday from 四季
Ink: Distress Marker Walnut Stain, Mustard Seed, Wild Honey 
Paper: Brighton Pier by Studio Calico, 5th and Frolic by Dear Lizzy for American Crafts
Embellishments: sequins from my local shop